Dive into the world of professional-grade image editing with Adobe Lightroom CC. This comprehensive guide explores the software’s capabilities, from basic adjustments to advanced techniques, equipping you with the skills to transform your photos. We’ll cover everything from importing and organizing images to exporting high-quality results, ensuring you’re ready to take your photography to the next level.
Lightroom CC is a powerful tool for photographers of all levels, providing intuitive navigation and a wealth of features. Whether you’re a seasoned professional or just starting out, this guide will provide a clear path to mastering the software.
Introduction to Adobe Lightroom CC
Adobe Lightroom CC is a powerful image editing and management application specifically designed for photographers. It excels in organizing, developing, and enhancing digital photographs. Its intuitive interface and comprehensive features make it a popular choice for professionals and enthusiasts alike, offering a streamlined workflow for various stages of the photographic process.
Lightroom CC addresses the core principles of digital photography by providing tools for managing large collections of images, applying creative adjustments, and maintaining image quality throughout the editing process. It prioritizes non-destructive editing, allowing photographers to experiment with different looks without permanently altering their original files. This flexibility is crucial for iterative refinement and creative exploration.
Target User Groups
Lightroom CC caters to a diverse range of users. Professional photographers benefit from its robust editing capabilities and workflow efficiency, enabling them to process large volumes of images with precision. Hobbyist photographers find Lightroom CC a user-friendly platform for refining their photos and sharing their work. Students using Lightroom CC can learn and practice essential image editing techniques, aiding in their understanding of digital photography and image manipulation.
Core Functionalities
Lightroom CC’s core functionalities revolve around image organization, adjustment, and export. Its cataloging system allows for efficient organization and retrieval of photos, while its powerful adjustment tools provide precise control over aspects like exposure, color, and tone. Lightroom CC also facilitates the creation of high-quality image exports suitable for various platforms and printing requirements. A key advantage is its non-destructive editing, which preserves the original image data.
Comparison with Other Software
| Feature | Lightroom CC | Photoshop |
|---|---|---|
| Image Editing | Specialized in non-destructive adjustments to RAW and JPEG images, primarily focused on color grading, exposure, and tone mapping. | Offers a broader range of tools for more complex image manipulation, including retouching, compositing, and detailed adjustments. |
| Image Organization | Excellent organization and cataloging features, supporting metadata management and efficient searching. | While offering organization tools, it is not as specialized or intuitive for large photo libraries as Lightroom. |
| Workflow | Streamlined workflow designed for photographers, optimizing the editing process. | A powerful tool, but the workflow can be more complex for photographers focused on image editing and organization. |
| Price | Subscription-based, typically offering a more affordable option for frequent users. | Often a one-time purchase, making it more expensive in the long run for frequent users. |
This table highlights the distinct strengths of Lightroom CC and Photoshop. While Photoshop provides comprehensive image manipulation, Lightroom CC excels in the efficient management and editing of photographic images. This difference is key to understanding how each software serves different aspects of the photographic workflow.
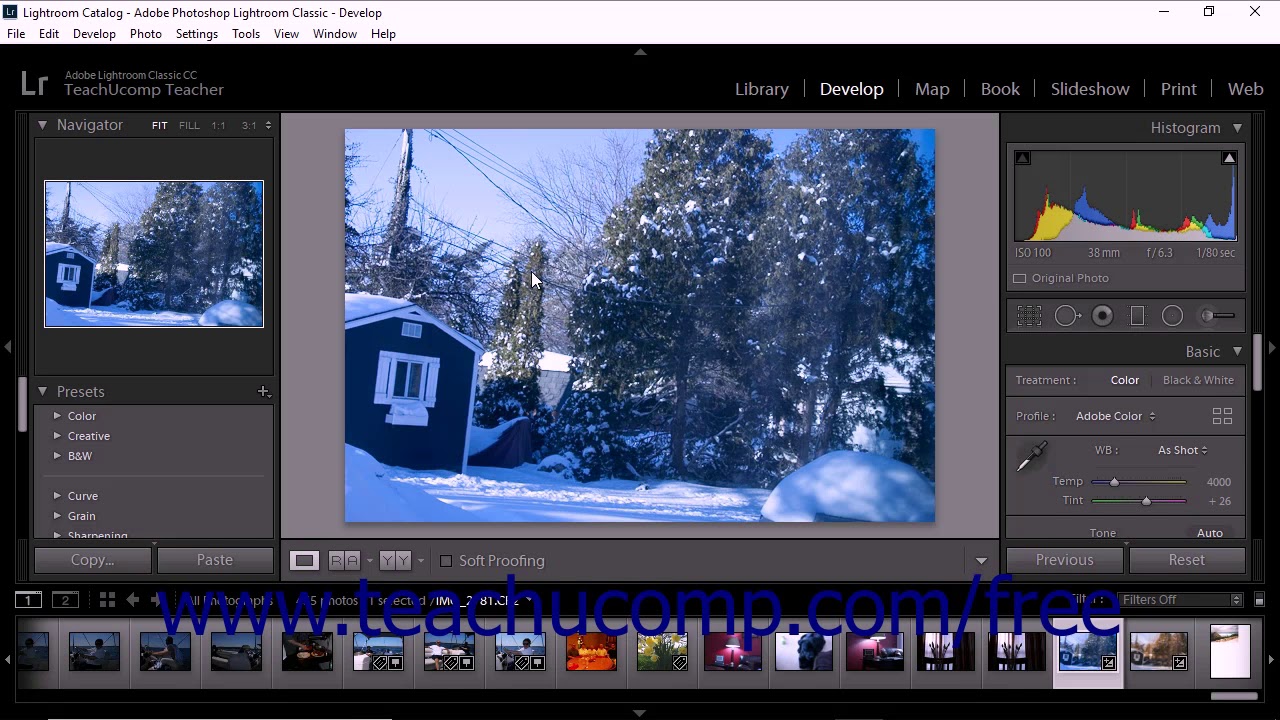
Lightroom CC Interface and Navigation
The Adobe Lightroom CC interface is a powerful and intuitive tool for managing and editing photographs. Its layout is designed to be highly customizable, allowing users to arrange panels and tools to best suit their workflow. This section delves into the structure of the interface, providing detailed navigation instructions, and highlighting essential tools.
The interface is divided into distinct modules, each dedicated to specific functions, such as importing photos, adjusting image settings, and organizing your library. Mastering navigation through these modules is key to efficiently using Lightroom CC.
Interface Modules and Panels
The Lightroom CC interface is structured around key modules, which contain various panels. Understanding these modules and their corresponding panels enables efficient navigation. The core modules include the Library module, which focuses on organizing and previewing photos; the Develop module, where adjustments are made; the Slideshow module, for creating slideshow presentations; and the Print module, for generating print-ready images. Each module contains specific panels tailored to the module’s function.
Navigation within Modules
Navigating within Lightroom CC is straightforward. Using the tabs at the top of the screen, you can easily switch between the Library, Develop, Slideshow, and Print modules. Within each module, panels are designed to be intuitive, with clearly labeled options and controls. For instance, in the Library module, you can navigate through your photo collection using the folder structure and filter options, while the Develop module provides numerous controls for adjusting color, tone, and other image characteristics.
Commonly Used Tools and Features
Lightroom CC offers a wealth of tools and features. Understanding the functions of the most commonly used tools can significantly improve workflow efficiency. These tools include the basic editing tools for adjusting brightness, contrast, highlights, shadows, and more, found in the Develop module. The Library module also contains essential tools for organizing photos, including ing, tagging, and rating.
Panel Overview
| Panel | Function |
|---|---|
| Library Panel | Displays and organizes your photos by folders, metadata, and other criteria. This panel enables quick access to images and their associated data. |
| Develop Panel | Contains controls for adjusting various aspects of the image, including exposure, white balance, and color correction. This panel is central to image editing within Lightroom CC. |
| Metadata Panel | Displays and allows modification of details such as date, location, and other metadata related to your photos. This panel allows you to accurately record and manage image information. |
| Film Strip | Provides a visual representation of your photos in the Library module. This panel is crucial for quickly selecting and viewing photos. |
| Histogram Panel | Displays a visual representation of the tonal distribution in your image, assisting in adjusting exposure and tonal ranges. |
Image Importing and Organization
Getting your images into Lightroom CC and organizing them effectively is crucial for efficient workflow. Proper import and organization saves time and frustration when you need to find a specific image later. This section details the process, from importing to creating effective systems for managing your photography library.
Importing Images
Lightroom CC offers several ways to import images, each tailored to different needs. Directly dragging and dropping files from your computer is a fast method for adding images. You can also use the “Import” dialog box to select folders or specific files for importing, allowing you to control the import options. The “Import” dialog box provides advanced settings, such as renaming files, applying metadata, and choosing the location for your imported photos. This control ensures that your images are imported and prepared for use in the way you desire.
Organizing Images with Tags
Effective image organization goes beyond simply placing files in folders. Tags provide a powerful way to categorize your images. They allow you to add s, descriptive words, or phrases related to the subject matter, location, or mood of an image. Adding tags is a simple process. A single image can have multiple tags, allowing you to search for images based on various criteria. This flexible tagging system is vital for efficient searching and retrieval.
Creating and Managing Collections
Lightroom CC’s collections are sophisticated tools for grouping images based on projects, themes, or other criteria. Collections can contain other collections, fostering a hierarchical structure for managing vast image libraries. Collections provide a non-destructive way to group images. You can add or remove images from collections without affecting the original files. This allows for flexibility in arranging and regrouping your photos. This is particularly useful for large projects or series of images.
Managing Folders
Folders within Lightroom are crucial for organizing your images in a physical file structure. Using folders alongside collections offers a multi-layered approach to image organization. The folders act as containers for your images, providing a physical location for your files. You can create nested folders for a more granular organization, mirroring the directory structure on your computer. This approach ensures a logical relationship between your files and the folders on your hard drive.
Image Import and Organization Flowchart
[Image description: A flowchart would visually depict the process of importing and organizing images in Lightroom CC. The flowchart should start with “Select Images” and branch into “Import Via Drag and Drop” and “Import Via Dialog Box.” Each branch would then lead to a series of steps, including “Apply Metadata,” “Rename Files,” and “Tag Images.” A final step would be “Create Collections and Folders” with branches for “Organize into Collections” and “Organize into Folders.” The flowchart would then conclude with “Organized Images.” It would visually illustrate the various choices and options available to the user.]
Basic Editing Tools
Lightroom CC offers a powerful suite of tools for refining your images. These tools allow for precise adjustments to exposure, color, and other aspects, enabling photographers to transform raw images into polished masterpieces. Mastering these tools is crucial for achieving the desired aesthetic and conveying the intended message through your photographs.
Adjusting Exposure, Contrast, Highlights, Shadows, and Whites
These fundamental adjustments are key to controlling the overall tone and impact of your images. Correct exposure is paramount, ensuring the image isn’t too dark or too bright. Contrast controls the difference between the lightest and darkest parts of the image, affecting the overall visual impact. Highlights, shadows, whites, and blacks sliders allow for targeted adjustments to specific areas of the image, preventing clipping or loss of detail. Precise control over these aspects can dramatically enhance the quality and appeal of your photographs.
- Exposure adjusts the overall brightness of the image. Overexposed areas appear washed out, while underexposed areas are too dark. Carefully adjusting exposure ensures a balanced image.
- Contrast controls the difference between light and dark tones. Increasing contrast creates a more dramatic image, while decreasing it results in a softer, more subtle look. Finding the right contrast level depends on the specific image and desired effect.
- Highlights adjust the brightest parts of the image. Excessive highlights can lead to loss of detail in bright areas. Careful adjustments maintain the subtle details in those areas.
- Shadows adjust the darkest parts of the image. Excessive shadow adjustments can lead to the introduction of noise. A balance is crucial for maintaining detail in the shadowed regions without sacrificing overall image quality.
- Whites adjust the brightest white tones. Correctly adjusting whites helps maintain accurate color representation and prevents clipping.
Correcting Color Casts and White Balance
Color casts and incorrect white balance can significantly affect the overall mood and realism of an image. Learning to correct these issues is essential for achieving professional-looking results. Lightroom CC provides intuitive tools to accurately correct these issues.
- Color Casts: Color casts, like a yellowish or bluish tint, result from improper lighting conditions. Color casts can be corrected using the “Temperature” and “Tint” sliders, which allow for precise adjustments to the overall color balance of the image.
- White Balance: White balance is the process of ensuring that white objects appear truly white in the image. Incorrect white balance leads to a color cast. Lightroom CC offers various preset white balance options to correct the color cast in the image. These options include daylight, cloudy, tungsten, fluorescent, and flash.
Basic Editing Tools Summary
| Tool | Functionality |
|---|---|
| Exposure | Adjusts the overall brightness of the image. |
| Contrast | Controls the difference between light and dark tones. |
| Highlights | Adjusts the brightest parts of the image. |
| Shadows | Adjusts the darkest parts of the image. |
| Whites | Adjusts the brightest white tones. |
| Color Temperature | Adjusts the overall color tone (warmth/coolness). |
| Color Tint | Adjusts the color balance (green/magenta). |
Advanced Editing Techniques
Mastering advanced editing techniques in Lightroom CC unlocks a wider creative spectrum, enabling you to transform images beyond basic adjustments. These techniques allow for precise control over specific areas of an image, creating a more nuanced and artistic final product. From subtle enhancements to dramatic transformations, these methods empower photographers to achieve a diverse range of artistic effects.
Using Presets
Presets are pre-configured collections of adjustments that can significantly streamline your workflow. They offer a quick and effective way to apply specific styles and moods to your images. Choosing the right preset can dramatically alter the overall aesthetic, from a vibrant and energetic look to a serene and calming one. Experimentation with various presets is crucial for understanding their impact on your images and finding the ones that best suit your style.
Masking for Selective Adjustments
Masking in Lightroom CC allows for targeted adjustments to specific areas of an image. By creating masks, you isolate specific regions for precise editing, ensuring that the adjustments only affect the desired portions. This precision is invaluable for fine-tuning details, enhancing highlights, or softening shadows without affecting the overall image. Using a combination of brush tools and adjustment layers, masking facilitates detailed and controlled editing, achieving highly nuanced results.
Split Toning
Split toning is a technique that applies different color tones to the highlights and shadows of an image. This creates a visually appealing contrast and enhances the overall mood of the photograph. Split toning provides a rich palette of possibilities, allowing you to evoke a variety of moods, from a dramatic and intense look to a soft and romantic ambiance.
Tone Curves and Advanced Adjustments
Tone curves offer granular control over the tonal range of your image. By manipulating the curve, you can adjust highlights, midtones, and shadows with precision, achieving a wide spectrum of results. This control is essential for achieving specific artistic effects and fine-tuning the image’s overall tonal balance. Using tone curves, photographers can achieve a more nuanced and tailored look compared to basic sliders, enabling a more refined control over the tonal range.
Achieving Artistic Effects
Utilizing these advanced techniques in conjunction allows for a range of artistic effects. For example, a photographer might apply a warm split-tone to the shadows of a portrait, creating a romantic atmosphere. By using masking, they could further refine the highlights, ensuring the warm tone is applied only to the desired areas. Combining multiple techniques allows for the creation of complex and captivating images that evoke specific emotions or communicate particular ideas. The potential outcomes are vast, limited only by the photographer’s creativity and technical skills.
Exporting and Sharing Images
Exporting and sharing your edited images in Lightroom CC is crucial for preserving your work and distributing it effectively. Proper export settings ensure your images retain their quality while adapting to various platforms and purposes. Understanding these settings empowers you to share your images seamlessly across social media, websites, and print.
Exporting images involves more than just saving a copy. Choosing the right file format, resolution, and quality ensures your images look their best in different contexts. A correctly exported image will maintain its quality and details regardless of the platform or device it’s viewed on. Furthermore, understanding file size considerations allows you to optimize images for efficient sharing and reduces download times for your audience.
Exporting Image Formats
Different file formats cater to various needs. JPEG is a common choice for web images due to its relatively small file size. TIFF or PNG offer superior image quality, preserving details, but their file sizes are larger. Understanding these differences is essential for achieving the desired balance between quality and file size.
- JPEG (Joint Photographic Experts Group): This format is widely used for web images and online sharing. It provides a good balance between image quality and file size, making it suitable for general use. However, repeated editing of JPEG files can lead to quality degradation.
- TIFF (Tagged Image File Format): This format is ideal for high-resolution images, especially those intended for print or professional use. It maintains excellent quality, preserving details and color accuracy.
- PNG (Portable Network Graphics): This format is often preferred for images with transparent backgrounds or graphics. PNG also supports lossless compression, ensuring image quality remains high even after edits. It’s suitable for logos, icons, and graphics needing crisp details.
Exporting Resolutions and Dimensions
The resolution of your image significantly impacts its quality. Higher resolutions provide more detail, making them suitable for print or large displays. Lower resolutions are better for web use, as they reduce file size and load time. Understanding the intended use of the image is key to choosing the appropriate resolution.
- Web Images: For social media posts or website images, lower resolutions (72-150 DPI) are generally sufficient to maintain a good balance between quality and file size. For instance, a photo on a blog post may benefit from a lower resolution compared to a high-resolution print.
- Print Images: High resolutions (300 DPI or higher) are critical for print quality. This ensures crisp details and sharp images when printed. A poster or magazine cover would require a much higher resolution compared to a website image.
Exporting Image Quality
Image quality settings directly affect the size and quality of the exported image. High quality generally produces larger files but better visual details. Lower quality results in smaller files but may lead to visible compression artifacts. Choosing the appropriate quality setting balances image quality with file size considerations.
- High Quality: Preserves the most details in the image, suitable for print or high-resolution displays. This is the best option for images that will be viewed at high magnification or on large screens. Example: Images for a photo book or a high-quality magazine.
- Medium Quality: Provides a good compromise between quality and file size. This option is appropriate for images that will be viewed on standard displays or shared online. Example: Images for social media or a blog post.
- Low Quality: Significantly reduces file size, making it ideal for web images. However, quality is compromised, and details may be lost. Example: A thumbnail image for a website gallery.
Sharing Images on Different Platforms
Various platforms have different requirements for image formats and sizes. Optimizing images for each platform is important to ensure they display correctly and look their best. Social media platforms often have specific guidelines for image dimensions and formats.
- Social Media: Images for social media should be optimized for the specific platform (e.g., Instagram, Facebook, Twitter). Different platforms have different aspect ratios and recommended sizes.
- Websites: Website images should be optimized for web use with appropriate file sizes and formats to ensure fast loading times. Consider factors like image compression, resolution, and format to optimize for various screen sizes.
Creating Optimized Images for Web Use
Optimizing images for web use involves reducing file sizes without sacrificing quality. Techniques like compression and resizing are crucial to ensure fast loading times.
- Image Compression: Use lossy compression (like JPEG) for web images, but choose the highest quality setting that works for your needs. Lossless compression (like PNG) is better for graphics that need sharp details, but files tend to be larger.
- Resizing: Resize images to the appropriate dimensions for the intended platform. This reduces file size and improves loading speed.
Working with RAW Files

RAW files contain unprocessed image data directly from the camera sensor. This uncompressed data offers unparalleled flexibility in post-processing, allowing for greater control over the final image’s appearance. Leveraging RAW files in Lightroom CC empowers photographers to achieve superior image quality and creative freedom.
Benefits of Working with RAW Files
RAW files provide a significant advantage over JPEGs. They retain a wider dynamic range, meaning they capture more detail in both highlights and shadows. This is crucial for situations where extreme light conditions exist, as RAW files can often recover detail lost in JPEGs. Moreover, RAW files offer greater latitude in adjustments like white balance, contrast, and color saturation. This allows for more precise control over the final image, ultimately enabling the photographer to achieve their desired aesthetic.
Importing and Editing RAW Files Effectively
Import RAW files into Lightroom CC in the same way as JPEGs. Lightroom automatically detects the RAW file format and provides the necessary tools for editing. Upon import, pay attention to the metadata associated with each image, such as the camera settings, date, and time of capture. This metadata is crucial for later organization and reference.
RAW File Adjustments for Optimal Results
A range of adjustments are available to enhance RAW files in Lightroom CC. These adjustments fall into categories that address tonal adjustments, color adjustments, and lens corrections.
- Tonal Adjustments: These encompass adjustments to exposure, contrast, highlights, shadows, whites, and blacks. These tools allow you to recover detail from underexposed or overexposed areas, fine-tune contrast, and sculpt the tonal range of the image. Precise adjustments to these settings are critical in capturing the desired look.
- Color Adjustments: White balance is a critical adjustment, allowing you to match the color temperature of the image to the lighting conditions. Other tools within this category enable the photographer to fine-tune color saturation, vibrance, and tint. These tools provide the ability to maintain accurate color rendering or achieve creative color grading.
- Lens Corrections: Lightroom CC offers tools for correcting lens distortion, such as vignetting and chromatic aberration. These corrections enhance image quality and ensure a professional aesthetic.
Examples of RAW Files and Results After Editing
Consider a landscape photograph taken on a sunny day. The RAW file might exhibit strong highlights in the sky, potentially losing detail. By adjusting the exposure and highlights in Lightroom, the photographer can recover detail in the sky without losing detail in the shadows of the landscape. This demonstrates how RAW files enable photographers to retain the full potential of their images.
Another example could be a portrait shot in a dimly lit environment. The RAW file will contain more data in the shadows, allowing the photographer to recover details and reduce noise, leading to a higher-quality portrait compared to a JPEG.
Troubleshooting and Common Issues
Lightroom CC, while powerful, can sometimes present challenges. This section details common issues users encounter and provides practical solutions. Understanding these issues and their fixes empowers you to efficiently address problems and continue your workflow smoothly.
File Corruption
File corruption, a common issue in digital photography, can manifest in Lightroom CC as missing or damaged images. This can stem from various factors, including hard drive errors, faulty memory cards, or issues during file transfer. Recognizing the symptoms of file corruption is crucial for effective troubleshooting. A corrupted image might display incorrectly in the catalog, exhibit unusual colors or artifacts, or fail to load altogether.
- Symptom Recognition: Identify potential signs of file corruption by checking for unusual visual anomalies in the imported images, such as strange color casts, jagged edges, or distorted shapes. Verify the image’s file size. A significantly smaller file size might indicate corruption.
- Solution 1: Verify File Integrity: First, ensure the original file on your storage device is not corrupted. Attempt to open the image in another image editing software to see if the problem persists. This will confirm if the issue is with Lightroom or the image itself. If the issue is with the image file itself, consider restoring from a backup.
- Solution 2: Repair or Re-Import: If the original file is corrupted, try to repair it using specialized file repair software. If that fails, re-import the image into Lightroom. Be sure to save the repaired or re-imported image to a new location. Ensure the new file location is on a different hard drive or partition from the original to prevent potential further issues.
- Solution 3: Backup Strategy: Implementing a robust backup strategy is crucial. Regular backups of your image files prevent data loss from various causes, including file corruption. Consider cloud storage or external hard drives for backup purposes.
Syncing Problems
Lightroom CC’s cloud syncing functionality can experience occasional glitches. These issues might involve synchronization failures, image upload errors, or difficulties in accessing synced files. Identifying the source of the problem is key to a swift resolution.
- Check Internet Connection: A poor or unstable internet connection is a frequent culprit. Verify your internet speed and stability. A slow or intermittent connection can cause syncing problems.
- Verify Cloud Storage Space: Ensure sufficient cloud storage space is available. A full or nearly full cloud storage quota can lead to synchronization failures.
- Review Lightroom CC Settings: Double-check the syncing settings in Lightroom CC. Verify that the desired folders and images are selected for synchronization. If the issue persists, consider temporarily disabling synchronization and then re-enabling it.
- Clear Cache: Clearing the Lightroom CC cache can sometimes resolve synchronization issues. This is usually found in the Lightroom CC application settings.
- Restart Lightroom CC and Your Computer: A simple restart of both Lightroom CC and your computer can often resolve temporary glitches. This helps to refresh the application and computer resources.
Troubleshooting Guide
| Issue | Possible Cause | Solution |
|---|---|---|
| Image not loading | Corrupted image file, insufficient storage space, incompatibility with Lightroom CC | Re-import the image, verify file integrity, ensure sufficient storage space |
| Syncing issues | Poor internet connection, insufficient cloud storage, Lightroom CC settings | Verify internet connection, check cloud storage space, review Lightroom CC settings, clear cache |
| Missing images in catalog | File corruption, incorrect file path, syncing errors | Re-import the image, verify the correct file path, troubleshoot syncing problems |
Workflow and Best Practices
A robust workflow is crucial for managing a large photo library effectively in Lightroom CC. It streamlines the process from importing to exporting, ensuring consistent quality and efficient access to your images. This section details effective strategies for managing, organizing, and editing your photos, leading to a smoother and more productive photo editing experience.
Effective Workflow Strategies for Large Libraries
A well-defined workflow is essential for managing large photo libraries efficiently. This involves creating a system for importing, organizing, and editing photos, ensuring rapid access and preventing confusion. Clear naming conventions, intelligent folder structures, and metadata tagging are key elements in creating an efficient workflow.
Organizing Photos for Faster Access and Editing
Efficient photo organization is vital for fast access and streamlined editing. A logical folder structure is critical for navigating through your photos quickly. Consider using a combination of folders and metadata tags for optimal organization. By tagging photos with relevant s, you can search and filter images with ease.
- Descriptive Filenames: Use descriptive filenames to reflect the content of each image. For example, instead of “IMG_1234.jpg,” use “landscape_sunset_goldenhour.jpg.” This simple practice aids in finding images later.
- Intelligent Folder Structures: Create folders based on criteria like date, location, or subject. A well-structured folder system ensures easy access to photos and avoids the clutter of a disorganized library.
- Metadata Tags: Utilize metadata tags for further organization. Tags can be added for s, subjects, or other pertinent information. This allows for flexible searches, filters, and sorting.
Maintaining a Consistent Editing Style
Maintaining a consistent editing style ensures a cohesive look and feel across your photo collection. This approach allows for a professional and recognizable presentation of your work. Developing a style guide or preset system is a valuable step in maintaining this consistency.
- Preset System: Creating Lightroom presets is a powerful tool for maintaining consistency. Presets can apply a specific set of adjustments to images, guaranteeing a standardized appearance. This approach allows for quick application of your editing style to many images.
- Style Guide: Develop a written style guide to document your preferred editing choices. This includes adjustments for white balance, contrast, saturation, and other critical elements. Consistency is enhanced by having a readily available guide.
Examples of Different Photo Editing Workflows
Different workflows cater to various needs and preferences. The optimal workflow often depends on the nature of the project, the volume of images, and the desired output.
- Event Photography Workflow: For events, a streamlined workflow is essential. Immediately after the event, images are imported, organized by date and time, and then edited. Using metadata is vital to efficiently find specific shots.
- Travel Photography Workflow: A travel photography workflow may prioritize organizing photos by location. This helps when creating a photo album or a slideshow. High-quality images are often prioritized for post-processing.
- Example: A photographer documenting a wedding would likely use a folder structure that organizes images by date, time, and location within the wedding venue. This allows for quick access and selection of the best images for their final presentation.
End of Discussion
From fundamental editing to advanced techniques, this guide has provided a comprehensive overview of Lightroom CC. We’ve explored its features, navigation, and best practices, enabling you to manage your photos effectively and achieve stunning results. By mastering these skills, you can elevate your photographic workflow and unlock your creative potential.


