Camera raw files hold a wealth of untapped potential, offering photographers unparalleled control over image quality. This exploration delves into the intricacies of raw files, from fundamental concepts to advanced techniques, equipping readers with the knowledge to elevate their photography.
Understanding the nuances between raw and JPEG formats is crucial for achieving the best possible results. We’ll examine the advantages and disadvantages of each format, enabling informed choices in capturing and processing images.
Understanding Camera Raw Files
Camera raw files, often abbreviated as CR2, NEF, or others, contain the unprocessed data directly captured by a digital camera’s sensor. They hold a wealth of information about the scene, including the luminance and color data from each pixel, without any in-camera adjustments. This raw data offers significant creative control, allowing photographers to fine-tune the image to their liking.
Fundamental Concept of Camera Raw Files
Camera raw files are digital files that store the precise data captured by a camera’s image sensor. They represent the unprocessed, uncompressed image information, preserving all the details captured by the sensor without any alteration or color space conversion. This raw data includes information about the luminance and color values of each pixel, along with metadata about the shooting conditions.
Comparison of Camera Raw and JPEG Files
| Feature | Camera Raw | JPEG |
|---|---|---|
| Data | Unprocessed sensor data | Processed and compressed data |
| Size | Larger file size | Smaller file size |
| Editing Potential | High editing flexibility | Limited editing flexibility |
| Compression | No compression | Lossy compression |
| Metadata | Extensive metadata | Limited metadata |
JPEG files, on the other hand, are compressed images. This compression process reduces the file size but results in some loss of data. Consequently, JPEGs offer less potential for post-processing adjustments compared to camera raw files. This lossy compression is a significant trade-off between file size and image quality.
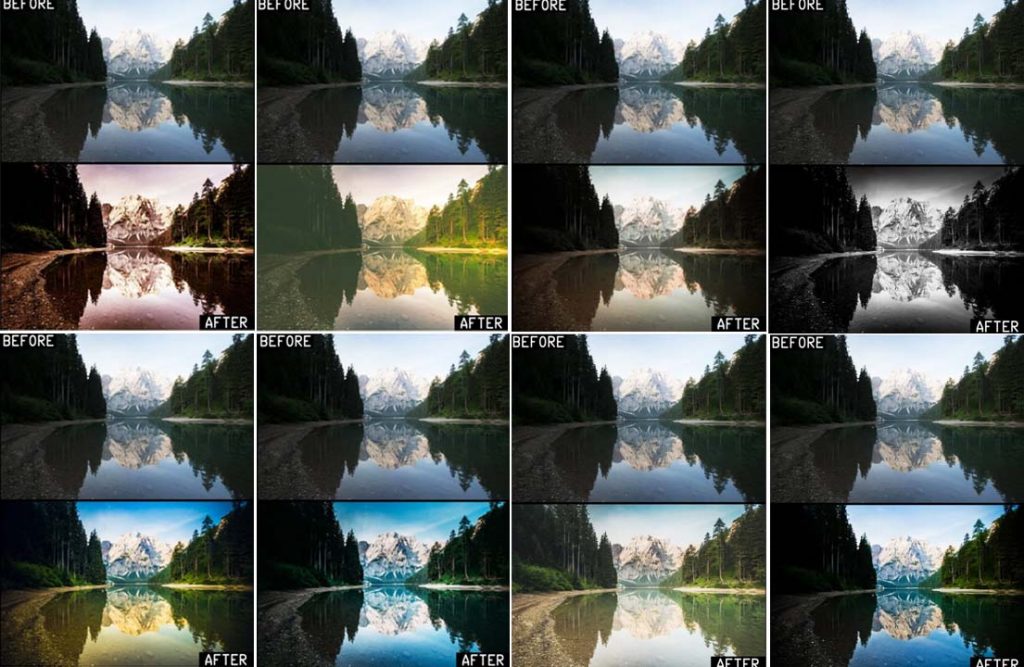
Advantages of Using Camera Raw Files
- Extensive Editing Potential: Camera raw files provide a wide range of adjustments for color balance, white balance, exposure, contrast, sharpness, and more. This allows for significant fine-tuning of the image to achieve the desired aesthetic.
- Preservation of Detail: The uncompressed nature of camera raw files retains all the details captured by the sensor, including subtle tones and textures that might be lost in JPEG compression.
- Precise Control: Camera raw files allow for adjustments in the image’s tonal range and color characteristics, providing a high level of control over the final output.
Disadvantages of Using Camera Raw Files
- Larger File Size: Raw files typically have significantly larger file sizes compared to JPEG files, which can impact storage space and processing time.
- Specialized Software: Editing camera raw files requires specialized software, such as Adobe Camera Raw, Capture One, or Lightroom, which might have a learning curve.
- File Format Variety: Different camera manufacturers use various camera raw file extensions, which can be a source of compatibility issues.
Typical File Extensions for Camera Raw Files
Camera raw files are identified by a variety of extensions depending on the camera manufacturer. Common extensions include CR2 (Canon), NEF (Nikon), RAF (Fuji), and others. This variation in extensions necessitates understanding the specific format used by your camera.
Converting a Camera Raw File to a JPEG
The process of converting a camera raw file to a JPEG involves using specialized software like Adobe Lightroom or Capture One. Within the software, the raw file is loaded, and adjustments are made to exposure, white balance, and other parameters. Finally, the edited image is exported as a JPEG file with the desired compression settings. This process allows the photographer to save the processed image in a smaller format for sharing or archiving.
Camera Raw Editing Software
Camera raw files, brimming with detail captured by your camera, require specialized software for optimal editing. This software provides tools to fine-tune images, enhancing their visual appeal and correcting imperfections. A variety of options exist, each with its own strengths and weaknesses, making the choice dependent on individual needs and preferences.
Various programs excel at editing camera raw files, offering comprehensive tools for adjusting color, contrast, and other crucial elements. Understanding the features and capabilities of each software is crucial for selecting the best option for your workflow.
Popular Camera Raw Editing Software
Several popular software packages are designed for editing camera raw files. These include Adobe Lightroom Classic, Capture One, and DxO PhotoLab. Each boasts unique features and strengths, catering to diverse user needs and skill levels.
Key Features of Popular Raw Editors
These software packages offer a range of key features. Lightroom Classic, for example, is known for its intuitive interface and robust organization tools. Capture One excels in its precise control over image adjustments, while DxO PhotoLab is renowned for its powerful noise reduction capabilities. The specific features of each software are Artikeld below.
Comparison of Camera Raw Editors
The table below compares three prominent camera raw editors: Adobe Lightroom Classic, Capture One, and DxO PhotoLab. This comparison considers cost, key features, and user experience to aid in selecting the best software.
| Software | Cost | Key Features | User Experience |
|---|---|---|---|
| Adobe Lightroom Classic | Subscription-based | Powerful organization tools, intuitive interface, comprehensive editing features, extensive library management | Generally considered user-friendly, particularly for beginners due to its intuitive interface. |
| Capture One | One-time purchase or subscription | Highly precise control over image adjustments, advanced masking tools, excellent performance, and powerful image organization | Steep learning curve for new users, but praised for its professional-grade features. |
| DxO PhotoLab | One-time purchase | Exceptional noise reduction, advanced lens corrections, and color grading tools, focus on raw file development | Good user interface, intuitive for users familiar with image editing. |
Workflow for Editing Camera Raw Files in Adobe Lightroom Classic
This section details a typical workflow for importing and editing camera raw files using Adobe Lightroom Classic.
First, import the raw files into Lightroom Classic. This process often involves selecting the desired import options and placing the files into the appropriate collection.
Next, apply basic adjustments to the images. This typically includes correcting exposure, contrast, highlights, shadows, and whites. Using the basic controls, you can quickly optimize the overall image.
Subsequently, apply more advanced adjustments as needed. This involves refining colors, sharpening details, and applying creative adjustments to achieve the desired aesthetic.
Finally, export the edited images in the desired format and resolution. This step involves setting the output specifications, including file format, quality, and dimensions.
Technical Aspects of Camera Raw
Camera raw files hold a wealth of information captured directly from the camera’s image sensor. This data, unprocessed and uncompressed, allows for significant creative control in post-production. Understanding the technical aspects of camera raw files is crucial for achieving optimal image quality and precision in editing.
Sensor Data in Camera Raw Files
Camera raw files essentially contain the raw sensor data. This data represents the light intensity detected by each pixel on the camera’s image sensor. The data is often in the form of a numerical representation of the light captured, often in 12-14 bit depth. This unprocessed information, unlike JPEGs, retains a broader dynamic range, encompassing a wider spectrum of light and shadow details. This is a significant advantage, as it allows for a greater degree of flexibility during editing, enabling recovery of detail lost in the initial image capture. Camera raw files also include the metadata associated with the image capture.
White Balance in Camera Raw
White balance in camera raw files is critical for accurate color representation. The camera’s sensor records light based on the prevailing light source (e.g., tungsten, fluorescent, daylight). Raw files record this information, allowing the editor to adjust the white balance to compensate for the light source and achieve more natural-looking colors. Inaccurate white balance can lead to images appearing overly warm, cool, or desaturated.
Color Spaces in Camera Raw
Camera raw files utilize different color spaces for representing the colors captured by the sensor. The choice of color space impacts how colors are displayed and edited. A common example is Adobe RGB, which covers a wider gamut of colors than sRGB, often used for print output. Understanding these color spaces and their implications is essential for ensuring accurate color representation in the final image.
Camera Raw File Formats
Camera raw files are typically stored in proprietary formats specific to each camera manufacturer. While the underlying data remains consistent, the file structures may vary slightly. Adobe Camera Raw (ACR) is a widely used software application for processing these files. Examples include CR2 for Canon cameras, NEF for Nikon cameras, and RAF for Fujifilm cameras. Understanding the format allows for compatibility with the correct editing software.
Metadata in Camera Raw Files
Camera raw files contain embedded metadata that provides essential information about the image capture. This includes details like the camera model, shutter speed, aperture, ISO speed, focal length, date and time of capture, and GPS location. Metadata is crucial for image organization, referencing, and historical context. The ability to access and utilize this information allows for a comprehensive understanding of the image’s origin and capture conditions.
Camera Raw File Workflow
Camera Raw files, containing unprocessed image data from a digital camera, offer significant flexibility for post-processing. This workflow guides you through the essential steps for importing, adjusting, and saving these files, maximizing your control over image quality.
Importing Camera Raw Files
Importing Camera Raw files is a straightforward process. Using dedicated software, you locate the raw files on your storage device and select them for import. The software then loads the image data into its editing environment, allowing you to begin adjustments. Proper file management and naming conventions will ensure you maintain organization and prevent confusion. This is crucial for larger projects and long-term archiving.
Adjusting Exposure, Contrast, and White Balance
These three adjustments are fundamental to image enhancement. Exposure controls the overall brightness of the image, while contrast manages the tonal range from highlights to shadows. Correct white balance ensures accurate color representation, eliminating unwanted color casts. Carefully adjusting these parameters allows for precise control over the image’s appearance.
Comparing Color Correction Methods
Camera Raw offers various color correction tools. The most common methods include using presets, targeted adjustments (like color sliders and split toning), and the use of color grading tools. Presets provide a starting point, while targeted adjustments offer granular control. Choosing the right method depends on the specific needs of the image and the desired outcome.
Saving Edited Camera Raw Files
Saving edited Camera Raw files is critical for preserving your work. Different formats and quality settings influence file size and image quality. Choose a format that balances quality and file size, depending on the intended use of the image. It is also important to note that saving a Camera Raw file does not modify the original unprocessed file. This allows you to experiment and revert to previous states if necessary.
Common Adjustments and Their Effects
| Adjustment | Effect | Example |
|---|---|---|
| Exposure | Adjusts the overall brightness of the image. | Increasing exposure brightens the image; decreasing exposure darkens it. |
| Contrast | Controls the difference between light and dark areas in the image. | Increasing contrast amplifies the differences; decreasing contrast softens them. |
| White Balance | Adjusts the color temperature of the image, removing color casts. | Adjusting white balance corrects for the color of light source, such as incandescent, fluorescent, or daylight. |
Advanced Techniques
Camera Raw offers a powerful suite of tools for refining images beyond basic adjustments. This section delves into advanced techniques for achieving exceptional results, from meticulous noise reduction to sophisticated detail enhancement and distortion correction. Understanding these advanced methods allows photographers to extract the maximum potential from their raw files.
Camera Raw’s advanced tools allow photographers to fine-tune images, recovering detail, correcting flaws, and enhancing the overall visual appeal of their work. This extends beyond basic adjustments, addressing more complex issues like noise reduction, sharpening, and lens distortion. Employing these techniques leads to higher quality, more professional-looking images.
Noise Reduction Techniques
Camera Raw files, especially those shot in low-light conditions, can exhibit noise. Advanced noise reduction tools in Camera Raw aim to minimize this effect without compromising image sharpness. Careful selection of the noise reduction parameters is critical for maintaining image quality. Over-aggressive noise reduction can lead to a loss of detail and a “muddy” appearance.
- Luminance Noise Reduction: This tool targets the grainy, speckled noise in the image’s tonal range. Adjusting the slider controls the intensity of noise reduction, with lower values preserving more detail and higher values reducing noise more aggressively.
- Chromatic Noise Reduction: This tool targets color noise, often appearing as colored speckles or artifacts. It works independently of luminance noise reduction, allowing for more targeted correction.
- Adaptive Noise Reduction: This method analyzes the image’s local areas to apply variable noise reduction. Areas with higher detail receive less aggressive noise reduction, maintaining texture and fine details. This is particularly useful for preserving subtle details while effectively removing noise.
Advanced Sharpening and Detail Enhancement
Camera Raw offers advanced sharpening tools beyond basic sharpening. These techniques aim to enhance fine details and edges without introducing unwanted artifacts. Precise adjustment is essential to achieve a pleasing and realistic sharpening effect.
- Sharpening Radius: Controls the area around edges that is sharpened. A larger radius affects a wider area, while a smaller radius focuses on more precise edge sharpening.
- Sharpening Detail: This setting adjusts the amount of detail enhancement, with higher values increasing the effect. It’s important to avoid over-sharpening, which can create a harsh or unrealistic look.
- Sharpening Amount: This controls the overall intensity of sharpening. Careful adjustment is key to balancing detail enhancement with avoiding a “blocky” appearance. A gradual and calculated approach is often preferred.
Correcting Lens Distortion
Lens distortion can manifest as barrel or pincushion distortion, warping straight lines. Camera Raw offers tools to correct these distortions. Correcting lens distortion ensures straight lines remain straight, improving the overall composition and accuracy of the image.
- Lens Distortion Correction: Camera Raw often provides profiles for various lenses, allowing for automatic correction. Manual adjustments can fine-tune the correction for specific lens characteristics.
Handling Different Camera Raw Files
Different camera models may have unique raw file structures and characteristics. Understanding these differences allows for appropriate handling and adjustments within Camera Raw. Utilizing the correct camera profiles is essential for optimal image quality.
- Camera Profiles: Camera Raw typically includes pre-defined profiles for various camera models. These profiles can account for the unique characteristics of each camera sensor, color space, and other factors. Selecting the appropriate profile is essential for accurate color representation and consistent image quality across different camera models.
Data Loss Prevention
Careful handling of Camera Raw files is essential to avoid data loss. Backing up files, using reliable storage, and avoiding accidental deletion or corruption are crucial steps. Regular backups ensure data safety in case of hard drive failure or other unforeseen circumstances.
- Backup Strategies: Regularly backing up files to external drives or cloud storage services is vital. Redundant backups protect against data loss due to hard drive failure or other issues.
- File Management Practices: Organize files logically and use descriptive file names to ensure easy retrieval and prevent confusion.
- Storage Medium Care: Using reliable storage media, avoiding physical damage, and keeping the storage environment stable helps prevent data corruption.
Raw Image Quality
Raw image files hold a wealth of data captured directly from the camera sensor, offering significantly more flexibility in post-processing compared to JPEG files. This allows for greater control over image adjustments, enabling photographers to fine-tune aspects like exposure, white balance, and sharpness. However, raw files are larger and require specialized software for editing.
Understanding the differences in quality between raw and JPEG images is crucial for photographers. Raw files, containing the full sensor data, maintain superior detail and dynamic range, leading to higher-quality images with more latitude for adjustments. Conversely, JPEGs, optimized for smaller file sizes, achieve this compression at the expense of some image detail.
Comparison of Raw and JPEG Images
Raw files capture a broader range of tones and colors, offering a significantly greater dynamic range than JPEGs. This means raw files can preserve more detail in both highlights and shadows. JPEGs, by contrast, use compression that reduces the amount of information contained in the file. This compression can lead to artifacts and a loss of detail.
Factors Influencing Raw File Quality
Several factors affect the quality of raw images. The camera’s sensor resolution, noise levels at different ISO settings, and the lens’s optical quality all play a role. Proper camera settings, such as correct white balance, exposure, and ISO, are essential for achieving high-quality raw images.
Impact of Camera Settings on Raw Image Quality
Camera settings directly influence the raw image data. Correct exposure is critical. Overexposure or underexposure can lead to loss of detail in highlights or shadows, respectively. Similarly, white balance settings affect color accuracy. Choosing the wrong white balance can result in inaccurate colors. ISO settings also impact noise levels. Higher ISO settings, while useful in low-light situations, can introduce noise (grain) into the image.
Examples of Raw vs. JPEG Quality
Imagine two images, one captured in raw format and the other in JPEG. The raw image might exhibit finer details in the shadows and highlights, with a wider range of tonal variations. In contrast, the JPEG image might appear slightly compressed and less detailed, with less noticeable variations between dark and light areas.
Factors Degrading Raw File Quality
Several factors can degrade the quality of raw images. Incorrect camera settings, such as exposure errors or inappropriate white balance choices, can introduce artifacts. Additionally, problems with the camera sensor, such as dust or debris, can cause noticeable blemishes in the image. Furthermore, the processing software used to convert raw files to other formats, if not handled properly, can lead to unwanted changes in the image’s quality. Finally, lens imperfections can degrade image sharpness and clarity, and these effects will be visible even in raw files.
Illustrative Examples
Camera Raw files offer unparalleled flexibility in image editing, allowing for precise adjustments to exposure, white balance, and other crucial aspects. Understanding how to leverage these files is key to achieving optimal results. This section provides practical examples to illustrate the value and versatility of Camera Raw.
A Crucial Scenario for Camera Raw Files
High-dynamic range (HDR) photography often necessitates the use of Camera Raw. Scenes with significant variations in light, such as a landscape with bright sunlight and deep shadows, require precise adjustments to maintain detail in both highlights and shadows. Editing in Camera Raw allows photographers to recover details lost in JPEGs, ultimately resulting in a more accurate representation of the scene. Camera Raw files enable fine-tuning of exposure and tone curves, revealing hidden detail and achieving a balanced, high-quality image.
Improving Image Quality Through Camera Raw Editing
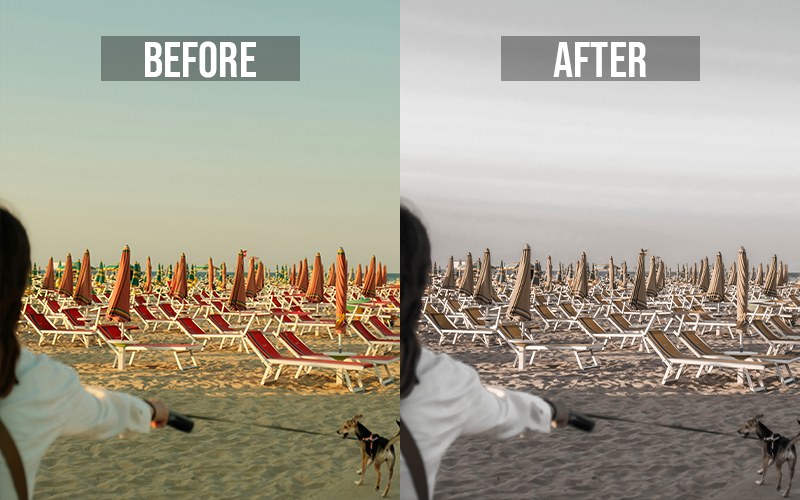
Camera Raw editing allows for adjustments that enhance image quality beyond the limitations of JPEG processing. For example, consider a photograph taken in overcast conditions. The image might appear flat in JPEG format. Camera Raw, however, provides tools to correct the lack of contrast and recover details, leading to a more vibrant and impactful final image. Adjusting the white balance in Camera Raw can also dramatically alter the color temperature, potentially transforming a cool-toned image into a warmer one, enhancing the overall mood and aesthetics.
Situations Where Camera Raw is Not Necessary
While Camera Raw offers significant advantages, it’s not always the optimal choice. In situations with simple lighting and minimal need for complex adjustments, a JPEG might suffice. Quick snapshots, social media uploads, or images intended for basic viewing do not require the extra processing time and steps associated with Camera Raw. The file size reduction inherent in JPEGs makes them suitable for such applications.
Differences in Raw File Processing Steps
The processing steps involved in various Camera Raw software applications are generally similar, though the precise interface and terminology may vary. Crucially, different software packages might offer different presets or tools, but the underlying principles of adjusting exposure, white balance, and color remain consistent. The key lies in understanding the workflow and tools available in the specific software being used.
| Step | Camera Raw Description |
|---|---|
| White Balance | Adjusting the color temperature and tint of the image. |
| Exposure | Adjusting the overall brightness of the image. |
| Contrast | Adjusting the difference in tones within the image. |
| Clarity | Enhancing the details in mid-tones. |
Camera Raw vs. JPEG: A Preferable Scenario
A critical situation where Camera Raw is highly advantageous is when capturing images with challenging lighting conditions or extreme dynamic range. For example, a landscape photograph with a dramatic sunset, where both the vibrant colors of the sky and the details in the foreground are critical, Camera Raw is essential. The ability to fine-tune highlights, shadows, and mid-tones in Camera Raw allows for the preservation of detail and accurate representation of the scene, achieving a superior quality compared to JPEG processing.
Final Conclusion
In conclusion, mastering camera raw files empowers photographers to unlock the full potential of their images. From basic adjustments to advanced techniques, this comprehensive guide provides a roadmap for achieving exceptional results. The detailed comparison of software options, coupled with step-by-step workflows, ensures readers gain a practical understanding of image editing.
Ultimately, understanding the technical aspects and workflow of camera raw, combined with the diverse examples and illustrative scenarios, enables a profound understanding of the power and versatility of raw image processing.


