Figma to PSD conversion is a crucial skill for designers working across platforms. This process enables seamless transitions from Figma’s vector-based design environment to Photoshop’s raster-based editing capabilities. Understanding the nuances of this conversion is key to maintaining design integrity and achieving optimal results. The methods explored cover a spectrum of tools and techniques, ensuring you have the flexibility to choose the approach that best suits your needs.
From basic file preparation to advanced conversion strategies, this guide will walk you through the intricacies of exporting Figma designs to PSD. We’ll delve into common issues, offer solutions, and provide illustrative examples to solidify your understanding. This comprehensive approach ensures you’re well-equipped to handle various design complexities, from simple layouts to intricate, responsive designs.
Introduction to Figma to PSD Conversion
Figma, a popular design tool, excels at creating interactive prototypes and detailed designs. However, sometimes, clients or downstream teams require the designs in Photoshop (PSD) format for various reasons. Exporting Figma designs to PSD format is a straightforward process that allows designers to maintain design fidelity and ensure seamless transition to the development stage.
The process involves extracting the vector-based design elements from Figma and converting them into raster-based images suitable for Photoshop. This conversion is crucial for maintaining the design integrity and ensuring that the final product reflects the intended design.
Methods for Figma to PSD Conversion
Several methods exist for exporting designs from Figma to PSD, each with its own advantages and disadvantages. Understanding these differences can help designers select the most appropriate method for their specific project needs.
Common Use Cases
Converting Figma designs to PSD format is commonly employed in various situations:
- Handing off to developers: PSD format is often the standard for handing over designs to developers. This format provides precise specifications for implementation.
- Maintaining design integrity: The conversion process ensures that the original design’s fidelity is preserved, preventing potential discrepancies during the development phase.
- Revisions and iterations: PSD files allow for easy editing and revisions, enabling a more iterative design process.
- Collaboration with clients: PSD files are frequently used for presenting designs to clients, offering a clear and detailed view of the final product.
Comparison of Tools and Methods
The following table compares various tools and methods for Figma to PSD export, highlighting their advantages, disadvantages, and appropriate use cases.
| Method | Advantages | Disadvantages | Use Cases |
|---|---|---|---|
| Figma’s built-in export feature | Simple, straightforward, often free or included with Figma subscription. | Limited control over the export process. May not preserve all design elements or interactions accurately. | Basic design export, quick handoff to developers, small teams. |
| Third-party plugins | Enhanced control over export options, often provide more accurate and comprehensive conversion. | Cost associated with the plugin. Requires learning curve to master features. | Complex designs, designs with interactive elements, large teams, or when precision is critical. |
| Manual extraction and assembly | Complete control over the output. Enables a meticulous process of conversion. | Time-consuming, requires significant technical expertise. | Designs with highly customized elements or complex layouts, for specialized projects, or when utmost control is required. |
Figma File Structure and its Impact
Figma’s intuitive interface and robust features often lead designers to create complex, layered files. However, this rich structure can present challenges when exporting to PSD, especially if not properly managed. Understanding how Figma’s file structure interacts with the PSD export process is crucial for a smooth conversion. The key is to understand how different elements within the Figma file translate to the final PSD output and how to organize layers effectively.
A well-organized Figma file translates to a more manageable and consistent PSD output. Conversely, a poorly structured Figma file can result in a complex, cumbersome PSD file that’s difficult to work with and potentially riddled with errors during the conversion process. The quality of the exported PSD directly reflects the organization and complexity within the Figma file.
Impact of Layer Organization
Properly organized layers are essential for a successful PSD export. Figma’s layer hierarchy directly influences the structure of the exported PSD file. Complex nesting of layers can lead to unnecessarily deep PSD hierarchies, making the design difficult to manipulate and potentially resulting in export errors. Careful consideration of the nesting level is crucial.
Components and their Influence
Components in Figma play a significant role in the export process. Components, when used effectively, streamline the export process, ensuring consistency and efficiency in the PSD output. Repeated elements are easily managed through components, leading to a clean and organized PSD. However, complex or improperly defined components can create issues during the conversion. Ensure that components are fully defined and properly linked in the Figma file to prevent inconsistencies in the exported PSD.
Best Practices for Export Optimization
Careful planning and organization of layers and components significantly improve the quality and efficiency of the PSD export.
- Maintaining a Logical Hierarchy: Employ a logical hierarchy for layers, grouping related elements together. This makes it easier to understand and navigate the design within the PSD. An example would be organizing all buttons into a “Buttons” group, or all text elements into a “Typography” group. This clear structure aids in troubleshooting and editing.
- Simplifying Component Usage: Avoid overusing components. Overly complex or deeply nested components can complicate the export process and lead to unexpected results. Ensure that components are reusable and straightforward.
- Avoiding Unnecessary Layers: Redundant or unnecessary layers should be removed to keep the Figma file streamlined and prevent errors during the export process. This ensures a more compact PSD, which improves the workflow.
- Consistent Naming Conventions: Adopt a consistent naming convention for layers and components. Descriptive names enhance readability and reduce confusion during the export and editing process. Using clear and concise names allows for a faster workflow.
Tools and Techniques for Conversion
Converting Figma designs to PSD involves several approaches, each with its own strengths and weaknesses. Choosing the right method depends on factors like the complexity of the design, the desired level of detail, and the available resources. This section delves into various tools and techniques, outlining their advantages and disadvantages.
A crucial aspect of successful conversion is understanding the nuances of each technique. Different methods cater to varying needs, and a clear comprehension of these nuances empowers designers to make informed decisions. This understanding also allows for efficient optimization of the conversion process.
Various Conversion Tools and Techniques
Various methods facilitate the conversion of Figma designs to PSD, each with its own advantages and drawbacks. The selection of the appropriate method depends on the project’s specifics and desired outcome.
- Manual Conversion: This approach involves manually recreating the design elements in Photoshop. This method provides complete control over the design, allowing for precise adjustments. However, it’s often time-consuming and prone to errors, particularly for complex designs. Manual conversion is ideal for smaller projects or when complete control is paramount.
- Figma Plugins: Dedicated plugins for Figma offer automated conversion to PSD. These plugins streamline the process, but the quality of the output often depends on the plugin’s capabilities. They are typically more effective for simpler designs.
- Third-party Conversion Services: Online platforms and dedicated services offer automated conversion tools. These platforms typically provide a user-friendly interface for uploading Figma files and receiving PSD outputs. Conversion speeds and accuracy vary greatly among these services. Factors such as design complexity and the specific service used play a critical role in the final output.
Comparison of Conversion Methods
A comparative analysis of different conversion methods is presented below, highlighting their strengths and weaknesses.
| Tool/Method | Description | Pros | Cons |
|---|---|---|---|
| Manual Conversion | Directly recreating design elements in Photoshop | Complete control, high precision | Time-consuming, error-prone for complex designs |
| Figma Plugins | Utilize Figma plugins for automated conversion | Streamlined process, reduced time | Output quality depends on plugin, may not handle complex designs |
| Third-party Conversion Services | Online platforms or services offering automated conversion | Convenient, automated process, potential for faster output | Conversion accuracy and speed vary widely, may lack fine-grained control |
Steps Using a Specific Conversion Tool (Example: Figma Plugin)
The following steps illustrate a typical workflow using a Figma plugin for conversion:
- Plugin Installation: Install the relevant Figma plugin that facilitates the conversion.
- File Preparation: Ensure the Figma file is properly structured and ready for conversion. Ensure layers and groups are appropriately organized for optimal output.
- Plugin Activation: Activate the plugin within the Figma file.
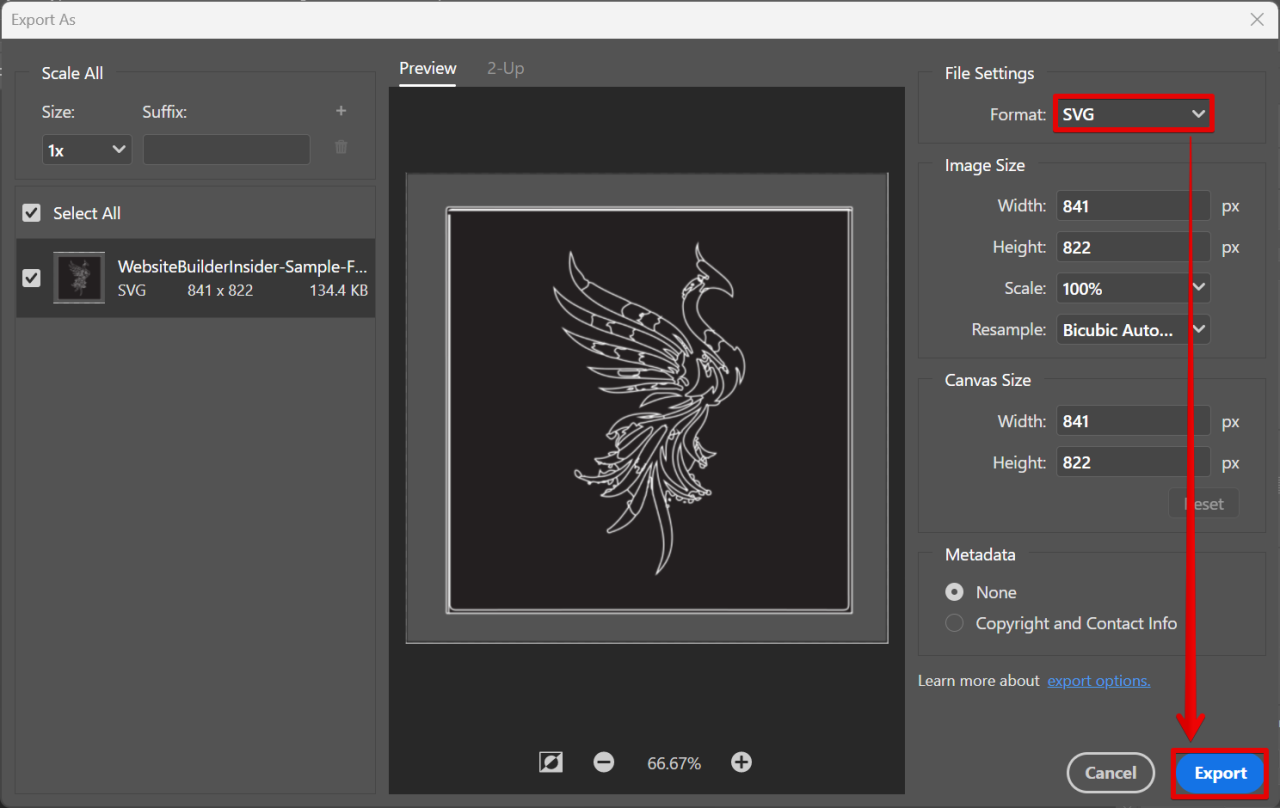
- Conversion Initiation: Initiate the conversion process through the plugin’s interface, specifying any necessary settings (e.g., export resolution, layer naming).
- Output Generation: The plugin will generate the PSD file, which needs to be saved on the local computer.
Tips for Optimizing Conversion
Several strategies can enhance the conversion process and improve the resulting PSD file’s quality:
- Proper Figma File Structure: A well-organized Figma file is crucial for smooth and accurate conversion. Use layers and groups effectively to reflect the design’s hierarchy.
- Layer Naming Conventions: Consistent naming conventions for layers and groups make the converted PSD file more manageable and facilitate future editing.
- Testing and Validation: Thoroughly test the converted PSD file to ensure accuracy. Check for any inconsistencies or errors in the converted design elements.
Common Conversion Issues and Solutions
Figma’s vector-based design often presents unique challenges when translating to the raster-based format of PSD. This section details common issues encountered during conversion and offers practical solutions to address them. Understanding these pitfalls is crucial for ensuring a smooth and accurate transition, preserving the integrity of the design.
Vector-to-Raster Conversion Problems
Vector graphics, inherently scalable, lose precision when converted to raster images. This loss manifests as jagged edges, blurring, and a noticeable reduction in quality, especially at higher zoom levels. The degree of degradation depends on the complexity of the design elements.
- Loss of Detail: Complex shapes and intricate patterns can suffer significant detail loss during conversion. Sharp corners or gradients may appear fuzzy or distorted. A design element with subtle shading or fine lines may become less visible.
- Aliasing and Jaggies: Rasterization often introduces jagged edges, particularly along lines and curves. This “aliasing” effect can detract from the visual appeal and professionalism of the converted design.
- Resolution Issues: The target resolution for the PSD file needs careful consideration. Choosing an insufficient resolution leads to pixelation and loss of sharpness, while an overly high resolution may not be necessary and can increase file size.
Solutions for Vector-to-Raster Conversion Issues
Careful pre-conversion adjustments and post-conversion optimization can minimize these issues.
- High-Resolution Export: Exporting the Figma file at the highest possible resolution to the PSD file ensures optimal pixel density. Using a high resolution from the start helps to retain the sharpness of lines and fine details.
- Anti-aliasing Techniques: Anti-aliasing algorithms can smooth out jagged edges during the rasterization process. Implementing this during the export procedure can mitigate aliasing and jaggies.
- Appropriate Resolution Selection: Selecting the appropriate resolution for the intended output medium (print, web, etc.) is critical. Consider the pixel dimensions for the end use, avoiding excessive or insufficient resolution.
Text and Typography Issues
Text is often a source of conversion problems. Variations in font styles, kerning, and leading can be lost or distorted in the conversion process.
- Font Embedding: Ensure fonts are properly embedded within the Figma file. Embedding fonts eliminates the need for external font files and prevents issues where fonts are missing during PSD opening.
- Font Substitution: If fonts aren’t embedded, the PSD application might substitute them with similar but different fonts. This can lead to a noticeable change in the text’s appearance and potentially impact design intent.
- Kerning and Leading: The precise spacing between letters (kerning) and lines (leading) can be lost during the conversion process. Carefully adjust these settings before exporting.
Handling Complex Design Elements
Gradients, effects, and other complex elements can present challenges.
- Gradient Reproduction: Converting gradients accurately often requires adjusting the number of color stops and their values to closely match the original Figma gradient.
- Effect Replication: Complex effects like drop shadows, glows, and strokes can lose their subtleties. Carefully analyze the effects and adjust them in the PSD file to replicate the original Figma appearance.
- Layer Organization: Maintaining the original layer structure in the PSD file helps with design modifications and revisions. This is crucial for keeping the original design’s intent visible in the PSD.
Maintaining Design Consistency
Maintaining design consistency throughout the Figma to PSD conversion process is critical for preserving the intended visual appeal and functionality of the design. A lack of attention to detail in this step can lead to inconsistencies in the final PSD file, impacting user experience and potentially requiring costly rework. Consistency ensures a seamless transition between the Figma prototype and the final deliverable.
Ensuring accurate and precise conversion requires a systematic approach. This method involves meticulous attention to every design element, from typography and color palettes to spacing and layout. Strict adherence to the Figma design specifications, coupled with a detailed checklist, minimizes errors and maximizes the fidelity of the conversion.
Importance of Design Elements
Design elements play a pivotal role in the quality of the final PSD file. Typography, color palettes, and spacing, when accurately replicated, contribute to the overall visual coherence of the design. A consistent color palette, for instance, maintains brand identity and enhances user recognition. Precise spacing and typography ensure legibility and a visually appealing layout, impacting user engagement and the overall impression.
Method for Ensuring Accuracy and Precision
A crucial method to guarantee accuracy and precision involves establishing a detailed checklist encompassing all design elements. This checklist should include specifications for fonts, colors, and spacing. Using Figma’s built-in design system features can streamline this process, enabling automatic adjustments to maintain design consistency across different components. Documenting the specifications for each design element and linking them to the corresponding Figma file ensures accountability and simplifies troubleshooting if discrepancies arise.
Preserving Original Design Intent
To effectively preserve the original design intent, a deep understanding of the Figma design principles is essential. Thorough documentation of the design rationale behind specific decisions, such as color choices or layout structures, will help maintain the visual identity and user experience established in the Figma design. Furthermore, referencing design guidelines and style guides helps in maintaining the consistency of the overall design language.
Maintaining Visual Hierarchy
Maintaining visual hierarchy is essential for a well-structured and user-friendly design. The visual hierarchy guides the user’s eye through the design, highlighting key elements and directing attention to crucial information. The conversion process must accurately reflect this hierarchy by ensuring that elements with higher importance (e.g., headlines) are visually prominent in the PSD file. Maintaining proper spacing and alignment, along with appropriate font sizes and weights, is paramount for preserving the intended hierarchy in the PSD output.
Advanced Conversion Strategies
Converting complex Figma designs to high-quality PSDs requires a nuanced approach. This involves not only understanding the technical aspects of the conversion process but also recognizing the intricacies of design elements, particularly those related to responsiveness and vector assets. Proper handling of these elements is crucial for maintaining design fidelity and ensuring a smooth workflow.
Handling Responsive Design Elements
Responsive design, crucial for modern web applications, presents unique challenges during conversion. Figma’s responsive features often involve multiple variations of a single component. To effectively translate this into a PSD, meticulous analysis of the responsive breakpoints is paramount. Identifying and extracting all variations for different screen sizes is essential for creating a comprehensive PSD layout. This approach ensures the design adapts seamlessly across various devices. This typically involves exporting multiple frames for each breakpoint, ensuring each frame accurately represents the intended design for that specific screen size.
Utilizing Plugins and Extensions
Several plugins and extensions can streamline the conversion process. These tools often automate tasks, reducing manual effort and improving efficiency. They can assist with tasks like exporting specific layers, optimizing image quality, and automatically resizing elements. By integrating these tools, designers can achieve a faster and more accurate conversion.
Managing Vector-Based Assets
Vector graphics are essential for scalability and clarity in designs. Conversion tools should be chosen with this in mind. Vector-based elements need to be meticulously preserved in the PSD. Rasterizing these elements can result in loss of quality and scalability, significantly impacting the design’s functionality and appearance. Tools or strategies to handle vector-based assets include ensuring proper preservation of the vector paths in the PSD format, which allows for resizing without loss of detail. Importantly, using appropriate export settings within Figma is crucial to ensure the vector elements remain in their original format.
Optimizing the Converted PSD File
Optimizing the converted PSD file is vital for web performance. After conversion, the PSD file might contain redundant or unnecessary information. The goal is to reduce file size while maintaining the quality of the design. This involves techniques like optimizing images within the PSD to reduce their file size without compromising visual fidelity. Image compression tools or plugins, or even simple image editing software, can achieve this. Layer organization and judicious use of smart objects and layers can significantly reduce the file size. Additionally, ensuring the PSD file is well-organized and streamlined will further optimize performance and minimize loading times.
Troubleshooting and Error Handling
Converting Figma designs to PSD files can sometimes encounter unexpected issues. Thorough troubleshooting is crucial for maintaining design consistency and ensuring a smooth workflow. This section details common errors, their solutions, and a structured approach to resolving them.
A systematic approach to troubleshooting conversion problems is essential. This includes identifying the source of the error, applying appropriate solutions, and verifying the outcome. A well-defined troubleshooting guide minimizes rework and ensures a high-quality final product.
Common Conversion Errors and Solutions
Troubleshooting Figma to PSD conversions often involves identifying and addressing specific issues. This section details common problems and their effective resolutions.
| Error | Description | Solution |
|---|---|---|
| Incompatible Figma Layers | Certain Figma layers or components might not translate correctly to PSD. This often arises from complex interactions or specific formatting. | Check the Figma file for any complex interactions or unusual layer properties. Simplify the layers or components if possible. Use the Figma’s “Export” feature and ensure correct layer names to avoid errors. Double-check the Figma file for hidden layers or incorrectly formatted elements. If the issue persists, consider using alternative conversion methods. |
| Missing or Incorrect Assets | Essential images, icons, or fonts may be missing from the converted PSD file. | Ensure that all assets (images, icons, fonts) used in the Figma design are correctly linked or included within the Figma file. Check the import paths and ensure all necessary files are in the correct location. If the issue is with a font, use a compatible font or add it to the PSD file. |
| Incorrect Export Settings | Inappropriate export settings in the conversion tool or Figma can lead to distorted images or missing elements. | Verify the export settings within the conversion tool or Figma. Ensure that the correct resolution, color profile, and other relevant settings are used. Test the export settings with a sample design to see if the result meets expectations. If the issue persists, review the conversion tool’s documentation for specific troubleshooting tips. |
| Layer Hierarchy Issues | The conversion may not correctly maintain the original layer hierarchy, leading to difficulties in editing the PSD file. | Adjust the Figma file’s layer organization and ensure clear naming conventions. Carefully examine the hierarchy within the Figma file. Use the conversion tool’s options for adjusting layer organization to match the intended structure. Ensure that the conversion tool or plugin supports the intended layer structure. |
| Rasterization Issues | Vector elements might be rasterized, causing loss of quality or scalability in the converted PSD. | Ensure that vector layers are exported as vectors in the Figma export settings. Verify the conversion tool’s settings to preserve vector elements. Check the Figma file for elements that are not vectorized and convert them. |
Troubleshooting Flowchart
A flowchart can streamline the troubleshooting process.
“`
[Start] –> [Identify the error] –> [Check Figma file] –> [Check Export settings] –> [Check assets] –> [Verify layer structure] –> [Test conversion] –> [Resolve issue] –> [Success] or [Retry with alternate method] –> [End]
“`
This flowchart guides users through a systematic process of identifying, verifying, and resolving conversion issues.
Systematic Troubleshooting Guide
A step-by-step guide to address common Figma to PSD conversion errors.
1. Identify the Problem: Carefully analyze the converted PSD file and note any discrepancies.
2. Inspect the Figma File: Examine the Figma design for any potential issues, such as missing assets, incorrect layer configurations, or complex interactions.
3. Review Export Settings: Verify the export settings within the conversion tool or Figma for proper resolution, color profiles, and other relevant configurations.
4. Check Assets: Ensure that all necessary images, icons, and fonts are present and correctly linked within the Figma file.
5. Verify Layer Structure: Assess the layer hierarchy in the converted PSD file and compare it to the original Figma design.
6. Test the Conversion: Use a test file to validate the conversion process and settings.
7. Resolve the Issue: Apply the appropriate solution based on the identified problem, and re-run the conversion.
Illustrative Examples
Figma to PSD conversion, while often straightforward for simple designs, can present unique challenges with intricate layouts and dynamic elements. This section provides illustrative examples, ranging from basic to complex designs, showcasing the conversion process and highlighting potential pitfalls. Each example demonstrates a different aspect of the conversion, from straightforward vector-to-raster conversions to more involved scenarios involving responsive design and interactions.
Simple Design Conversion
This example focuses on a basic button design. The Figma file contains a single button element with a defined shape, fill color, and text. The conversion to PSD involves exporting the button’s vector shape and text as individual layers. The PSD export maintains the original design elements, including color and text. A crucial step in this conversion is ensuring the correct pixel dimensions and resolution settings are applied in Figma before export. The visual representation of this conversion is a clean, straightforward transfer of vector shapes and text to the raster format of PSD. The conversion process highlights the straightforward nature of exporting simple objects.
Complex Design Conversion
This example demonstrates the conversion of a more intricate design, including multiple layers, various effects, and responsive elements. The Figma file includes a card component that changes appearance based on screen size. The conversion to PSD requires careful attention to layer organization and preserving responsive design elements. This conversion will require a deeper understanding of Figma’s design structure and careful consideration of the output format. The PSD export would have distinct layers representing different states of the card component for various screen sizes, each meticulously laid out and formatted for raster representation.
Conversion of Dynamic Content
This example focuses on dynamic content. The Figma design incorporates interactive elements such as expandable sections, clickable buttons that trigger animations, and elements that react to user input. Conversion to PSD necessitates careful attention to how these interactions translate to static images. The PSD export would retain the basic design elements but would need to present static representations of each state of the dynamic content. For instance, an expandable section would be represented in two PSD layers, one for the closed state and one for the expanded state.
Responsive Design Conversion
This example demonstrates a responsive design. The Figma design includes elements that adjust to different screen sizes. The conversion to PSD requires exporting multiple versions of the design, each corresponding to a different screen size. The PSD files would need to be carefully organized to represent the various responsive states, using different layers and sizes for each. The visual representation would demonstrate how the design adapts to different screen sizes through a collection of PSD files, each showcasing a specific layout for a particular device.
Conversion of Complex Layouts
This example showcases a complex design, incorporating multiple nested components and intricate layering. The Figma file contains a complex page layout with multiple sections and interactions. Conversion to PSD necessitates detailed layer organization and careful naming conventions. The PSD export would have a meticulously organized structure mirroring the Figma file’s layering. The visual representation of this conversion is a detailed breakdown of the original Figma design into individual PSD layers, each meticulously placed and organized.
Ultimate Conclusion
In conclusion, mastering the Figma to PSD conversion process empowers designers to seamlessly transition between design tools, ensuring consistent design across platforms. By understanding file structures, utilizing appropriate tools, and addressing potential issues, you can efficiently and effectively export your Figma designs to PSD format. This guide provides a structured approach to the entire process, from introductory concepts to advanced strategies, ultimately enabling you to achieve professional-quality results.


